
What is GraphQL?
GraphQL is an open-source query language for API, and a server-side runtime for executing those queries by specifying the shape of the response data. It was developed by Facebook in 2012 and released as an open-source project in 2015. In 2018 the GraphQL Schema Definition Language (SDL) became part of the specification. GraphQL provides a more efficient, powerful, and flexible alternative to the traditional REST API architecture for fetching and manipulating data from a server.
Key features
- GraphQL is a Query Language,
- Alternative to REST API,
- Unlike REST API, GraphQL exposes only one endpoint for all operations (Create, Read, Update, Delete),
- Still uses HTTP requests under the hood (specifically POST method),
- We specify what resource and what properies we want to get back,
- Fetch nested related data within a single query.
Problems that GraphQL solves
- Over fetching - getting back more data than we need (unnecessary load and sending excess information),
- Under fetching - getting back less data than we need (this requires making e.g. several requests).
Prerequisites
Before you begin, make sure you have basic knowledge about the following topics:
- NodeJS,
- TypeScript.
In this article I'll be using NodeJS v20.10.0 and TypeScript v5.3.2
Apollo Server
Apollo Server is an open-source GraphQL server implementation that allows you to build and run GraphQL APIs. You can run Apollo Server in various programming languages, including JavaScript (Node.js), Python, and more.
Create a new project
First of all, we need to create a folder for our server.
mkdir GraphQLArticle
cd GraphQLArticle
Then we need to init a new project with npm and set type property to allow us to use ES6 modules.
npm init --yes && npm pkg set type="module"
Install dependencies
Applications that run Apollo Server require two dependencies:
graphql- the library that implements the core GraphQL parsing and execution algorithms,@apollo/server- the main library for Apollo Server itself.
To install these dependencies we need to execute this command:
npm install @apollo/server graphql
As we can see in package.json file, dependencies have been installed and type property is set to module.
{
  "type": "module",
  "dependencies": {
    "@apollo/server": "^4.9.5",
    "graphql": "^16.8.1"
  }
}
Now we need to define if we want to use JavaSript or TypeScript. We will use TypeScript.
First let's create a src directory with an empty index.ts file to contain all of the code for our example application:
mkdir src
touch src/index.ts
Run the following command to install the typescript and @types/node packages into your project's dev dependencies:
npm install --save-dev typescript @types/node
Next, create a tsconfig.json file in your project:
touch tsconfig.json
The tsconfig.json file enables you to configure how TypeScript will compile your code. Add the following configuration to your tsconfig.json file:
{
  "compilerOptions": {
    "rootDirs": ["src"],
    "outDir": "dist",
    "lib": ["es2022"],
    "target": "es2022",
    "module": "esnext",
    "moduleResolution": "node",
    "esModuleInterop": true,
    "types": ["node"]
  }
}
Finally, replace the default scripts entry in your package.json file with the following:
{
  "scripts": {
    "compile": "tsc",
    "start": "npm run compile && node ./dist/index.js"
  }
}
The above start script tells TypeScript to compile your code into JavaScript before using node to run that compiled code.
Final package.json file should look like this:
{
  "name": "graphqlarticle",
  "version": "1.0.0",
  "description": "",
  "main": "index.js",
  "scripts": {
    "compile": "tsc",
    "start": "npm run compile && node ./dist/index.js"
  },
  "keywords": [],
  "author": "",
  "license": "ISC",
  "type": "module",
  "dependencies": {
    "@apollo/server": "^4.9.5",
    "graphql": "^16.8.1"
  },
  "devDependencies": {
    "@types/node": "^20.10.0",
    "typescript": "^5.3.2"
  }
}
You can now run npm start, which should successfully compile and run your empty index.ts file.
Setting up Apollo Server
First, we need to make some imports to be able to create Apollo Server and define the port.
import { ApolloServer } from '@apollo/server';
import { startStandaloneServer } from '@apollo/server/standalone';
const PORT = 4000;
After that, we have to set up our server.
const server = new ApolloServer({
  //typeDefs
  //resolvers
});

const { url } = await startStandaloneServer(server, {
  listen: {
    port: PORT,
  },
});

console.log(`Server is listening on port ${PORT}`);
First we're creating the server itself and then we're starting it on our local machine on the defined port (in our case 4000).
And that's a basic setup of the server, later we'll create typeDefs and resolvers functions to be able to make requests to our server.
All the start code base is available on branch initial under this link.
Type definitions
Type definitions in GraphQL are core aspect of defining the structure and shape of data that can be queried and manipulated through a GraphQL API. They define what kinds of objects can be requested and what fields they have.
GraphQL has a few scalar types which we'll be using most of the time:
String- text data,Int- 32-bit integer,Float- signed double-precision floating-point value,Boolean- true or false value,ID- special type used to represent unique identifiers. ID type is serialized in the same way as a String; however, defining it as ID signifies that it is unique within the GraphQL system.
Let's create a file schema.ts where we'll be storing all schema objects. We're creating three schemas that will be representing movie, review and author.
export const typeDefs = `#graphql
    type Movie {
        id: ID!
        title: String!
        category: [String!]!
    }

    type Review {
        id: ID!
        rating: Int!
        content: String!
    }

    type Author {
        id: ID!
        name: String!
        verified: Boolean!
    }

    type Query {
        movies: [Movie]
        reviews: [Review]
        authors: [Author]
    }
`;
Part #graphql at the beginning of template string helps IDE with syntax highlighting.
Exclamation mark (!) after type means that the field is required (cannot be null).
When we're creating array of string like in this field category: [String!]! we force both the array and the elements inside it to be required.
At the end we have a Query type. It's a special type in GraphQL that defines the entry points for the data that clients can read from the API. It means for example, if we call movies we'll get an array of Movie objects.
Now we can import these type defs to index.ts file and pass it to ApolloServer constructor.
const server = new ApolloServer({
  typeDefs,
  //resolvers
});
Resolver functions
Resolver functions are components that connect the GraphQL schema to the data sources. They are responsible for fetching or computing the data that's requested by a client's query or mutation.
Now let's create a database. We'll create a file with sets of arrays. Complete database is available here.
Create a file resolvers.ts and inside it we'll define resolver functions:
import db from './_db.js';

export const resolvers = {
  Query: {
    movies() {
      return db.movies;
    },

    reviews() {
      return db.reviews;
    },

    authors() {
      return db.authors;
    },
  },
};
First we import our file DB. Next create resolvers constant with Query property. And inside it we're creating functions which return specific arrays from the database. Notice that function names must match the names defined in the Query type in type defs.
One last thing to do is to add resolvers constant to Apollo constructor as a second argument in index.ts file.
const server = new ApolloServer({
  typeDefs,
  resolvers,
});
And that's it. Now we are able to make a request to our server. Let's run our server with npm start command. If everything goes well go to localhost:4000 in your browser and you should see Apollo Explorer UI.
Now let's create our first request - assume we want to get only movies and their categories.

As you can see we defined our resource - in this example it was movies and inside it we defined all properites we want to get - in this case title and category.
Now try making different requests with reviews and authors and try fetching different fields.
Query variables
Okay, but what if we want to get only one movie? Or one review? For this purpose we will use Query Variables.
First we have to extend our entry points by adding possibility to fetch for example one review.
movies: [Movie]
movie(id: ID!): Movie
As you can see we added id as a query variable (it's required) and as a result we expect one movie.
Now try to add query variables to reviews and authors resources.
After that we have to update resolver functions by adding new functions with the same names as in the schema where we return one particular eg. movie.
movie(_, args) {
    return db.movies.find(movie => movie.id === args.id);
},
We added movie function (singular form). Let's skip for now the first argument, as a second argument we have to add arguments. And we're returning one movie with a given id.
And that's it. Try to add resolver functions for review and author.
Now let's run the server and check if we can access one movie.
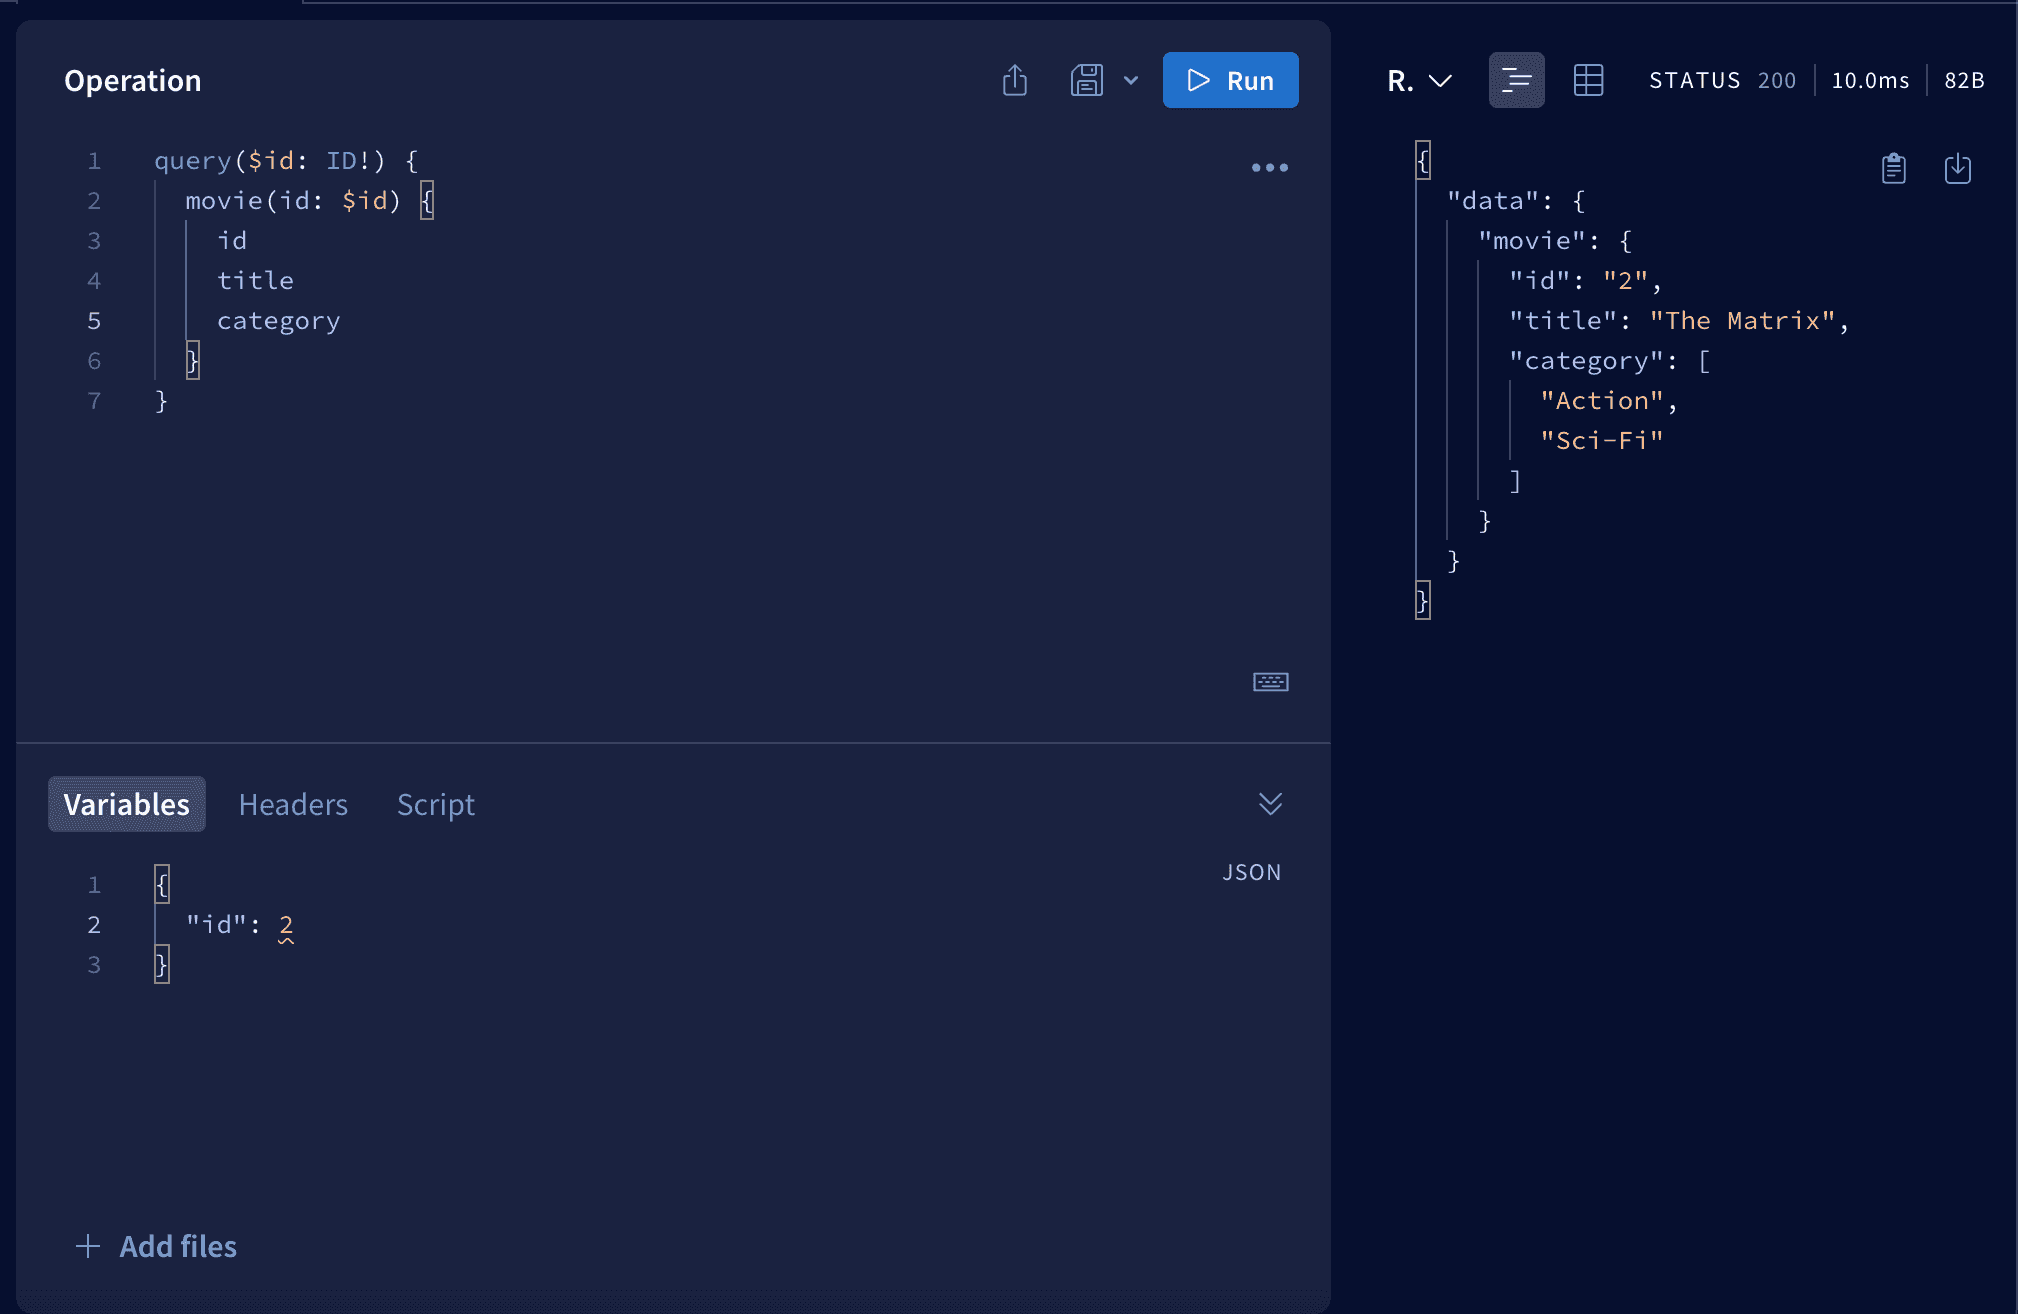
As you can see we can fetch one particular movie. We added id to our query and next we passed it to the movie function. In the Variables section below we defined (as a JSON object) what id we want to get.
Try to fetch one review and author as well to train this new feature.
Nested data
Now we can move to the most powerful and sophisticated feature in GraphQL which is relationships between our data.
As you can see in our database we have author_id and movie_id for each review.
{ id: '1', rating: 9, content: 'lorem ipsum', author_id: '1', movie_id: '2' }
So every review has associated author and every review has associated movie. And we use this relation for nesting data.
So as always we'll start with updating our schema. If every review has author and related movie, we'll add it to the schema (both movie and author are required because every review must have an author and the movie being reviewed).
type Review {
  id: ID!
  rating: Int!
  content: String!
  movie: Movie!
  author: Author!
}
Next every movie can have multiple reviews, so we need to add an array of reviews for Movie schema.
reviews: [Review!]
Please note, that we only added exclamation mark inside the brackets, because every object in this array has to be the review. But we can't add exclamation mark after end bracket because the movie may not have any reviews and we have to take that into account too!
And we can add the same line of code to Author schema because like the movie, author also can have multiple reviews. And that's enough for the schema, let's jump to the resolver functions to handle this case.
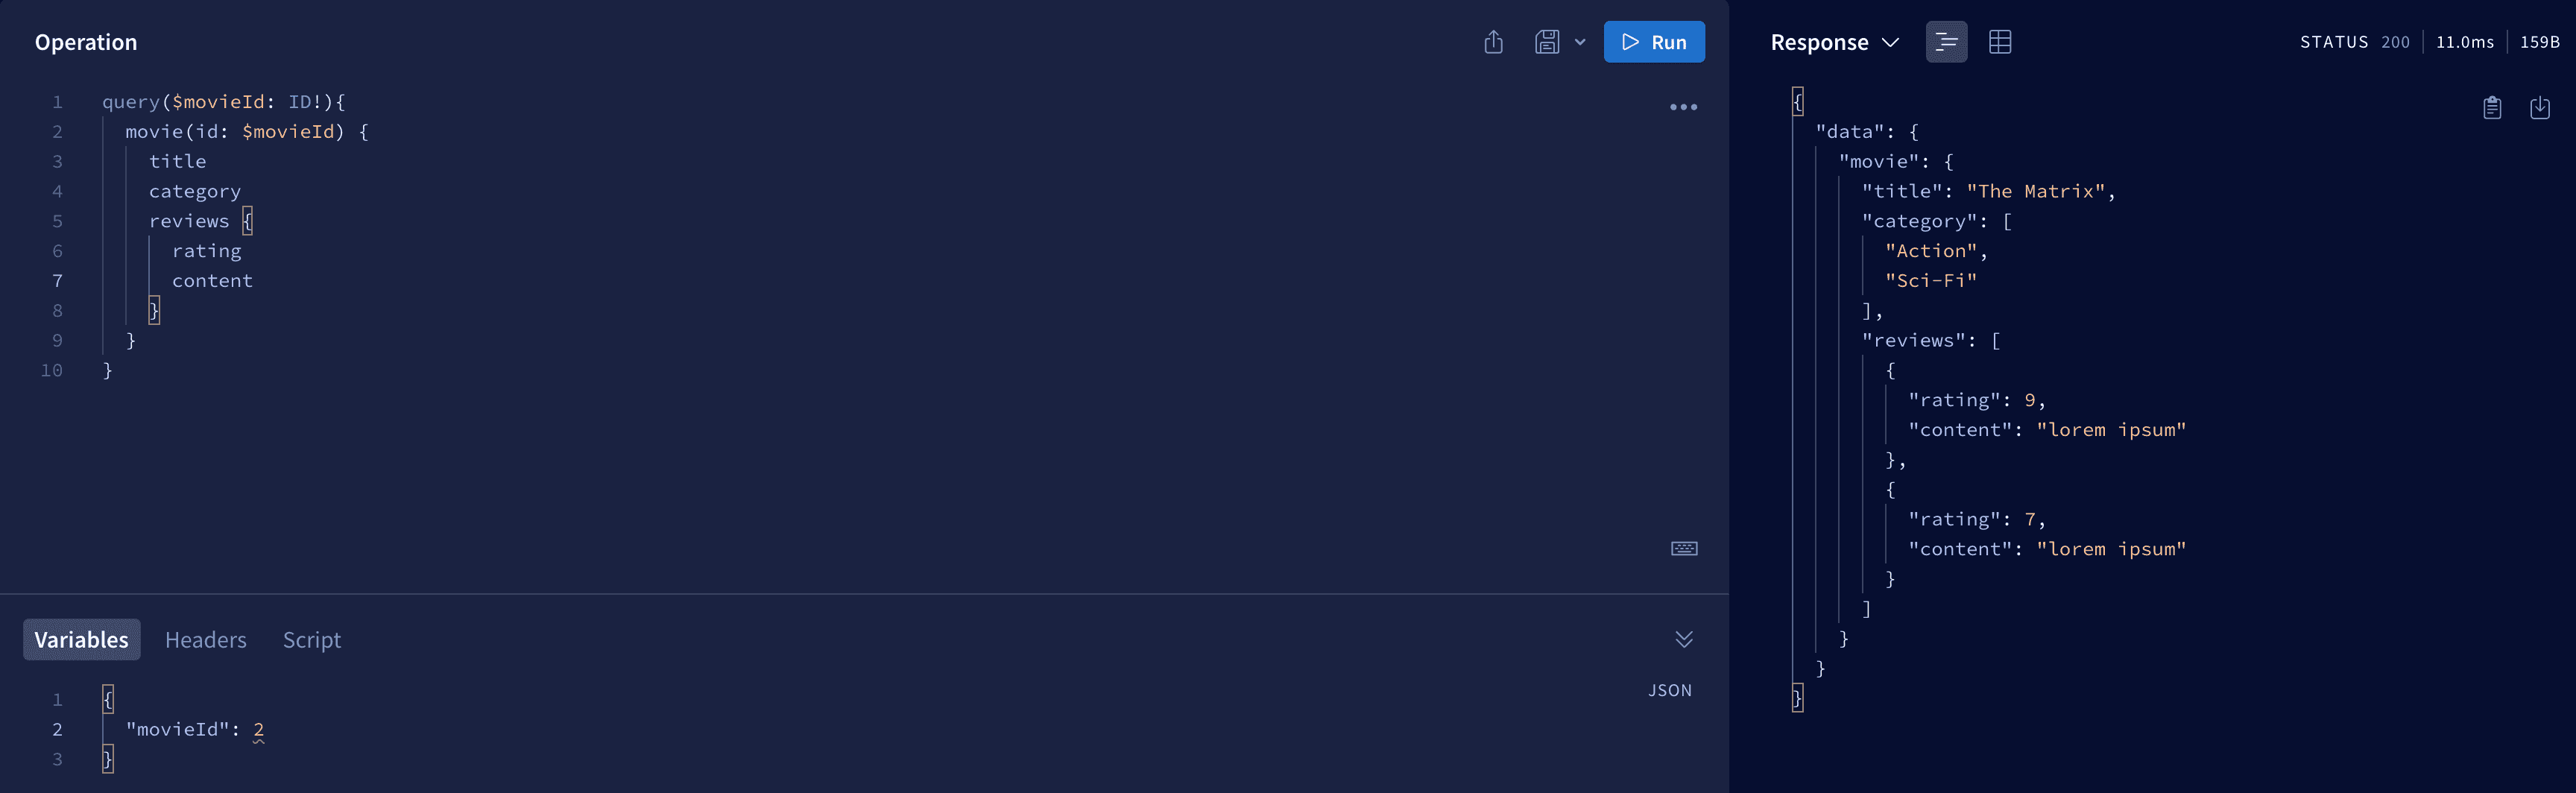
So our first case will be to fetch one movie and all reviews related to it. From a frontend side we want to make this kind of request.
query ($movieId: ID!) {
  movie(id: $movieId) {
    title
    category
    reviews {
      rating
      content
    }
  }
}
For now our server doesn't know how to handle it. And if we try to make this request we will get null in the reviews object.
We have to add a new entry in the resolver function, but not in Query object (because it's not an entry point for our graph), but next to it, as a second property like this.
export const resolvers = {
    Query: {
        ...
    },
    Movie...
}
It should look like this
Movie: {
    reviews(parent) {
        return db.reviews.filter(review => review.movie_id === parent.id);
    }
}
Now we can go back to the previous Query variables topic in which we skipped the first argument in our resolver function. Now it will be necessary. It's an argument which refers to the parent object. In our example it is a Movie. Thanks to it we can filter out all the reviews with given movie_id. And parent.id is really movie.id.
Let's try it and go to Apollo explorer and get movie with id = 2 and all reviews related to it.
Now try yourself to get:
- Specific author and reviews related to them,
- Specific review and its author,
- Specific review and associated movie.
You can find a solution here.
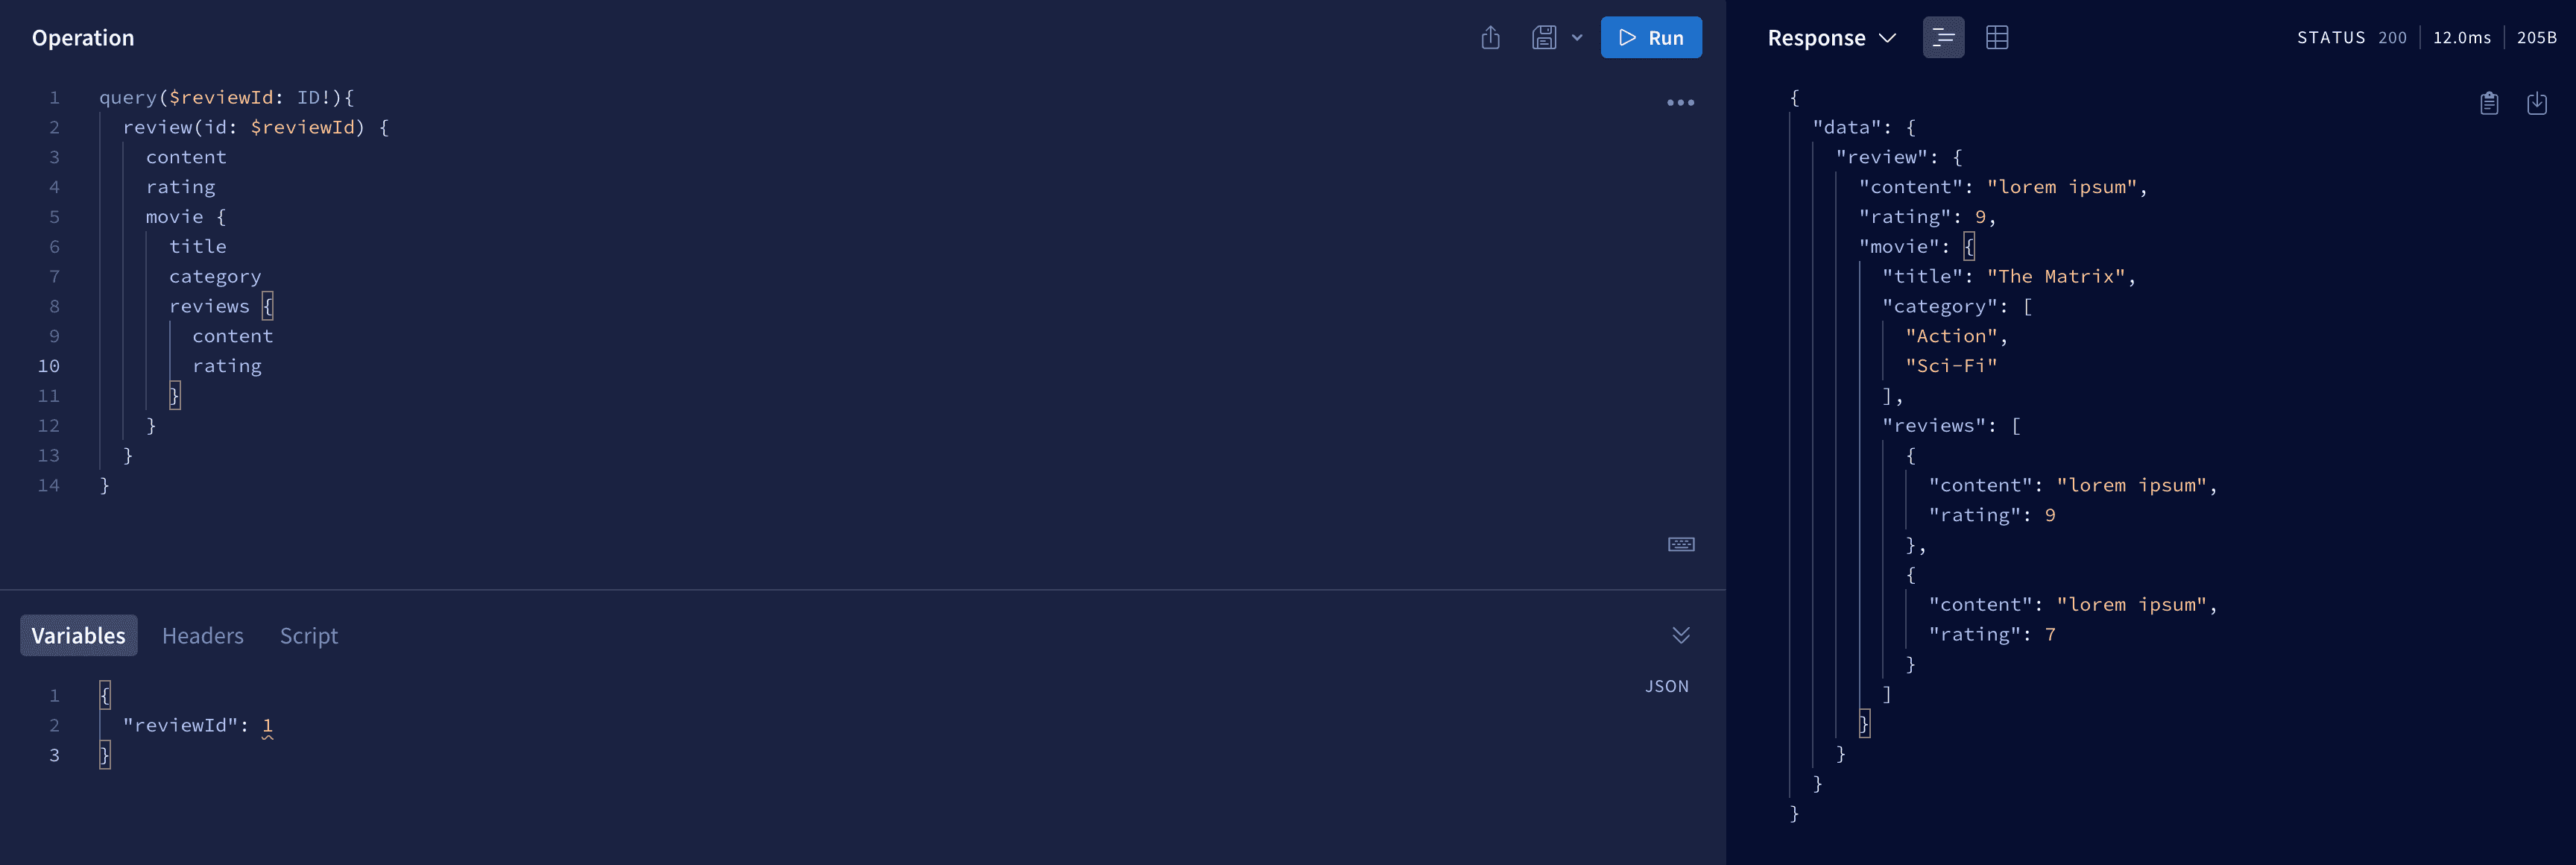
If you do it properly you should be able to make request like these, when we fetch a specific review with information about related movie and author.
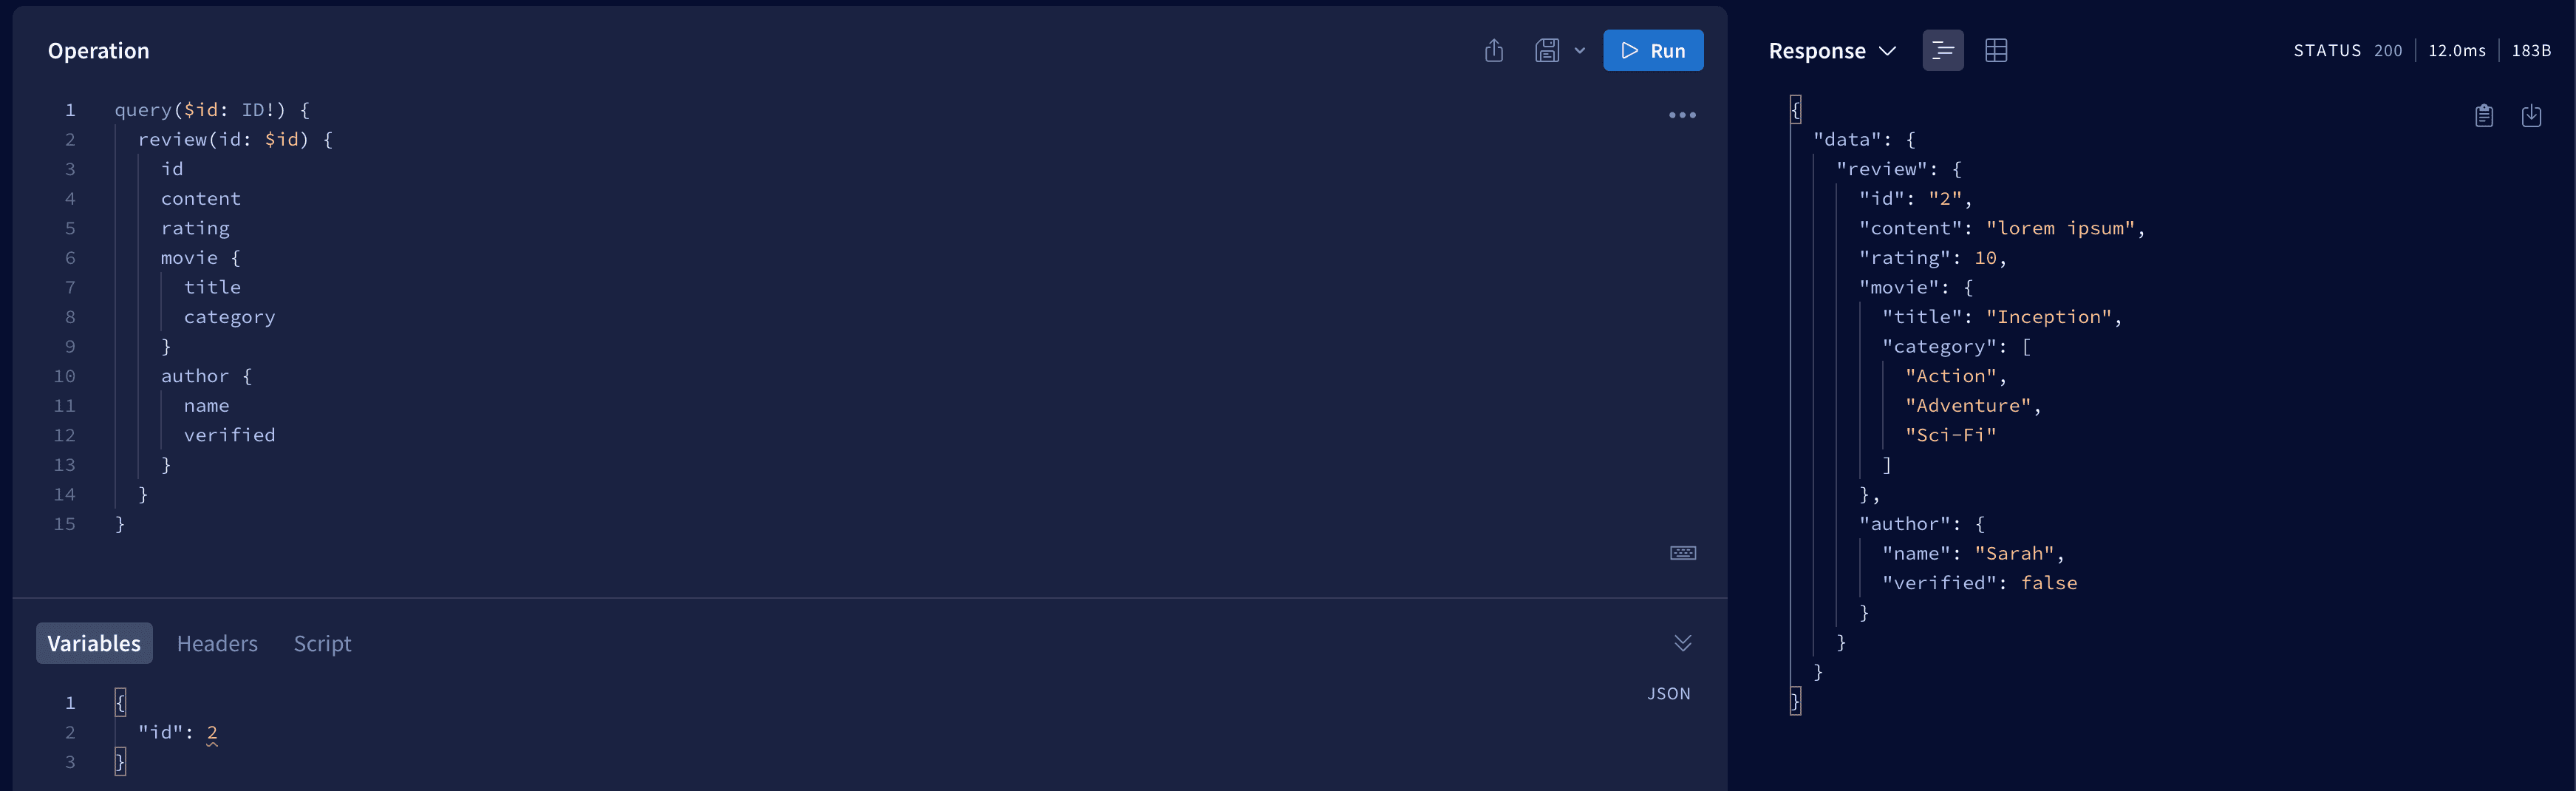
At this point we unconsciously created a resolver chain. This means we can now get into objects endlessly. We can now, for example, retrieve a specific review. Next we can get information about the movie related to this review. We can finally get all the reviews about this movie. This is all thanks to the fact that we have retained the resolver chain.
Mutations
Mutation is a type of operation used to modify data on the server. Unlike queries, which are used to fetch data, mutations are used to create, update, or delete data.
Delete mutation
As always we'll start with our schema and we add new type Mutation and deleteMovie function where we delete particular movie and return rest of the movies.
type Mutation {
  deleteMovie(id: ID!): [Movie]
}
Now we need to add resolver function where we'll be working with database.
Mutation: {
    deleteMovie(_, args) {
        db.movies = db.movies.filter(movie => movie.id !== args.id);
        return db.movies;
    }
}
Now how do we actually do the mutation on the frontend side? For now we're using query keyword for all the request where we're fetching data.
For delete, update and create we are using mutation keyword.
mutation Delete($id: ID!) {
  deleteMovie(id: $id) {
    id
    title
    category
  }
}
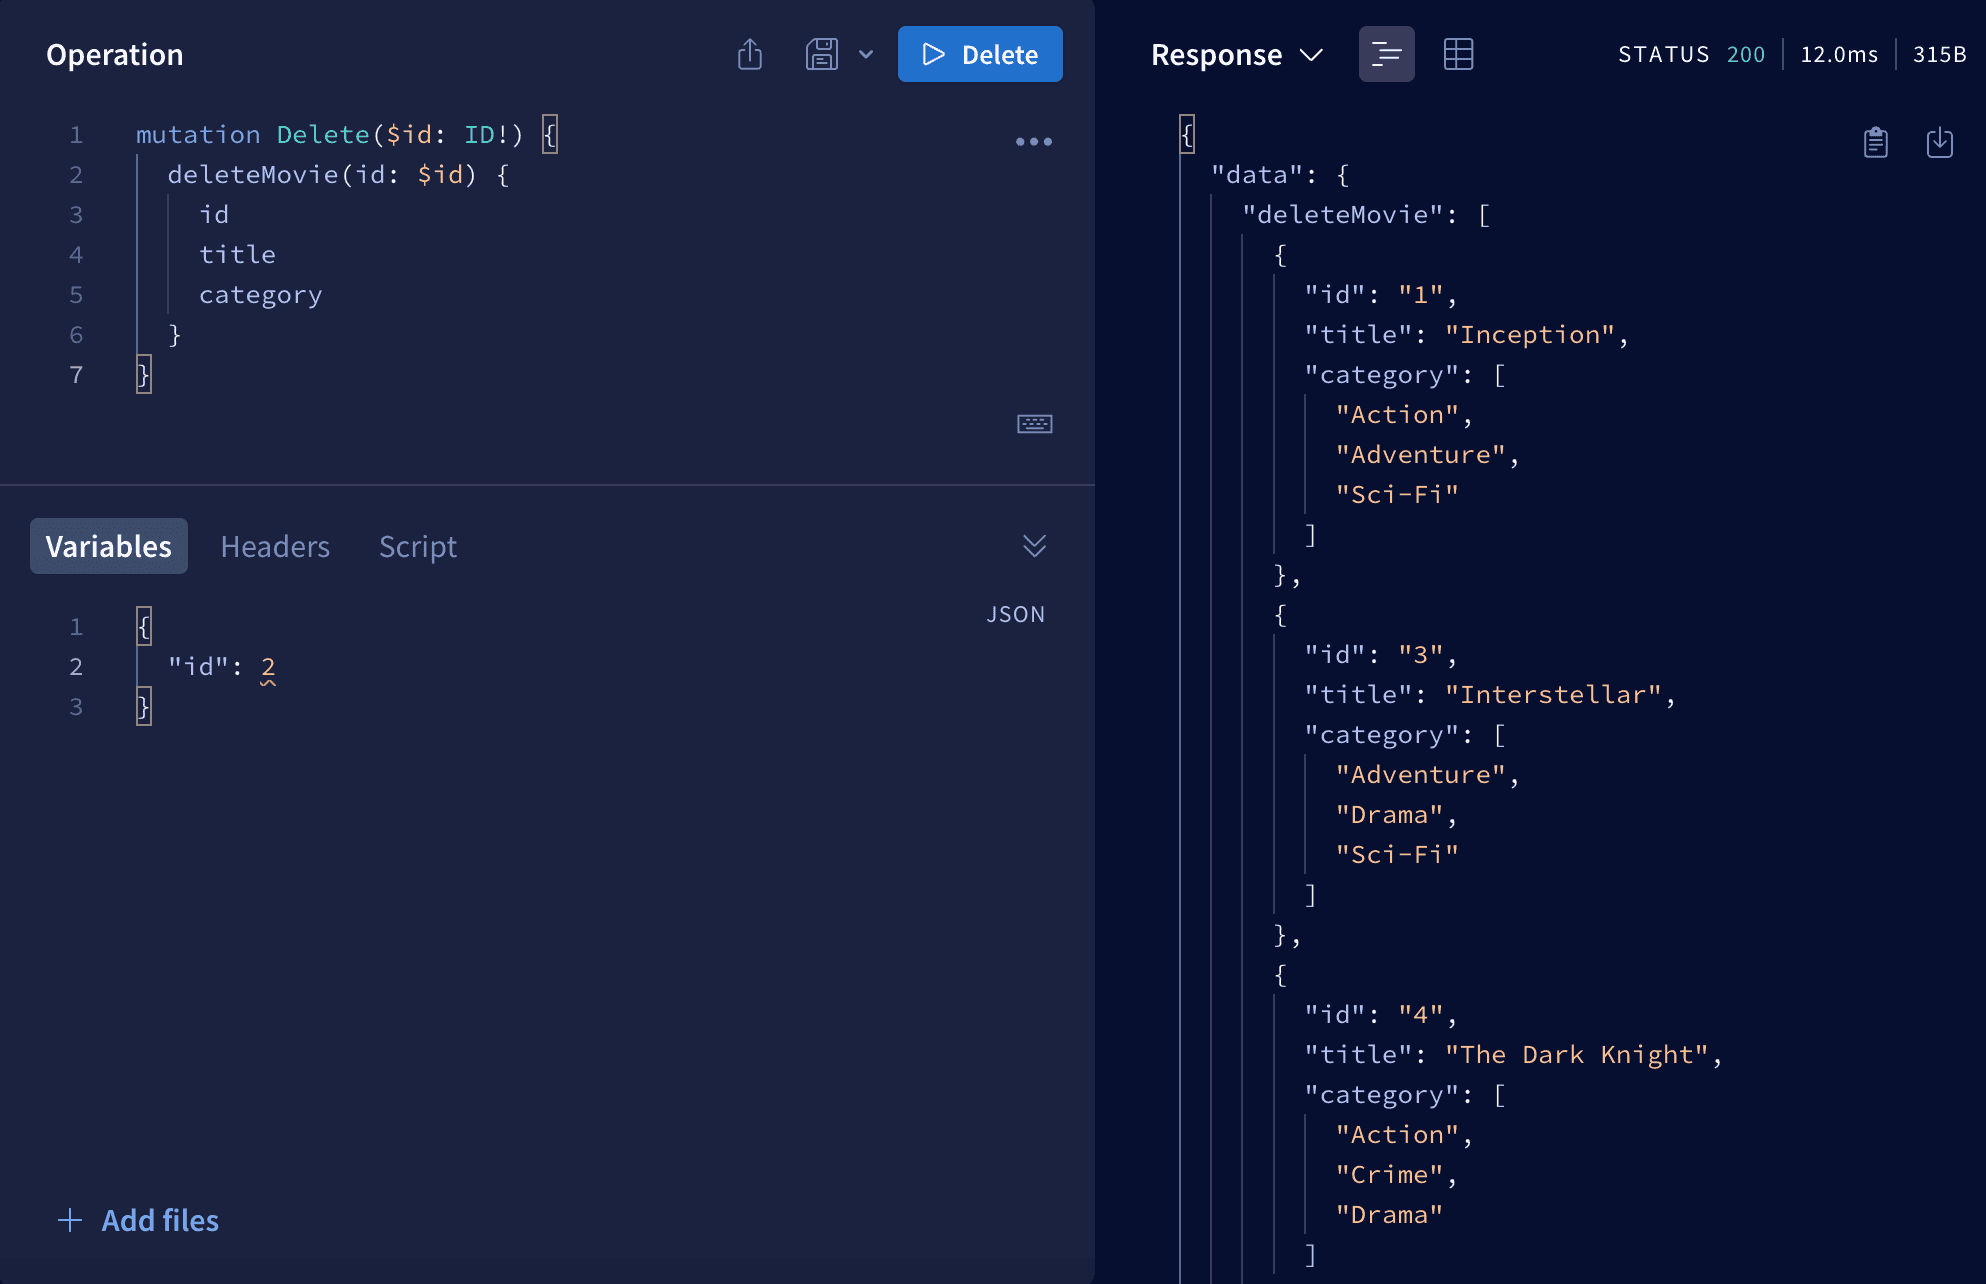
Remember, we want to get back the rest of the movies so we need to specify what fields we want to get back. And if you run it, you'll get back all the movies except this with id = 2. Now we're using hardcoded database so when you restart your server you'll have all the movies.
Create mutation
Now let's create a mutation. To do that we'll create addMovie mutation and as an argument we'll use new input type AddMovieInput. As a response we will get the created entry.
type Mutation {
  addMovie(movie: AddMovieInput): Movie
  deleteMovie(id: ID!): [Movie]
}

input AddMovieInput {
  title: String!
  category: [String!]!
}
Now let's make resolver function to it.
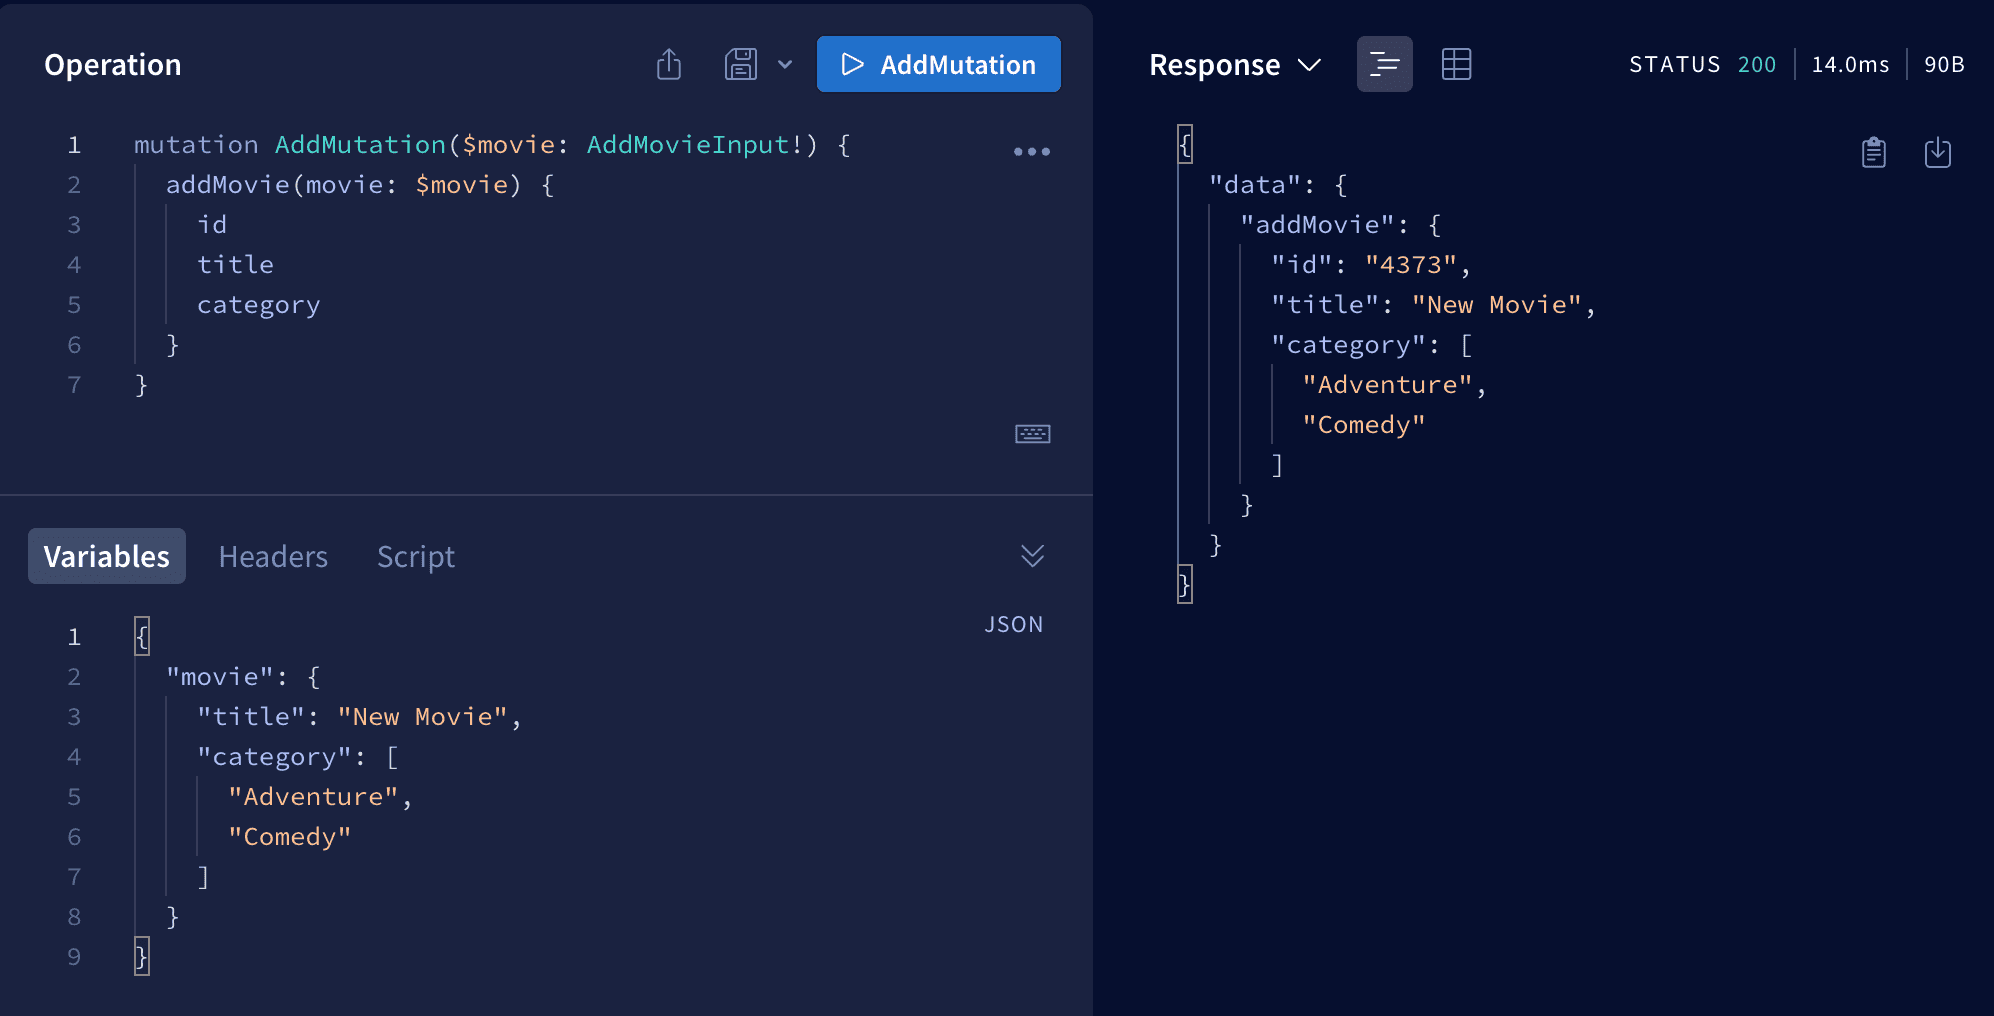
addMovie(_, args){
    let movie = {
        ...args.movie,
        id: Math.floor(Math.random() * 10000).toString()
    }
    db.movies.push(movie);
    return movie;
}
As you can see we created a new movie from given arguments. Then we generated an ID. Next we'll push new movie to DB and return this movie. You can see results below.
Now please check if the movie has been created (using query keyword).
Update mutation
As always we'll start with schema and we'll create updateMovie mutation.
updateMovie(id: ID!, edits: EditMovieInput!): Movie
And for this purpose we created a new EditMovieInput input.
input EditMovieInput {
  title: String
  category: [String!]
}
We did this because:
- We don't want to allow the modification of the ID,
- We made both
titleandcategoryarrays optional, because we don't know what fields the user would like to change.
If we did this, we can move on to the resolver function.
updateMovie(_, args) {
    db.movies = db.movies.map(movie => {
        if (movie.id === args.id) {
            return { ...movie, ...args.edits };
        }
        return movie;
    });
    return db.movies.find(movie => movie.id === args.id);
}
In this function we edit a movie with particular id, and we can specify if we want to change only one field or many fields. As a response we return a movie with given id.
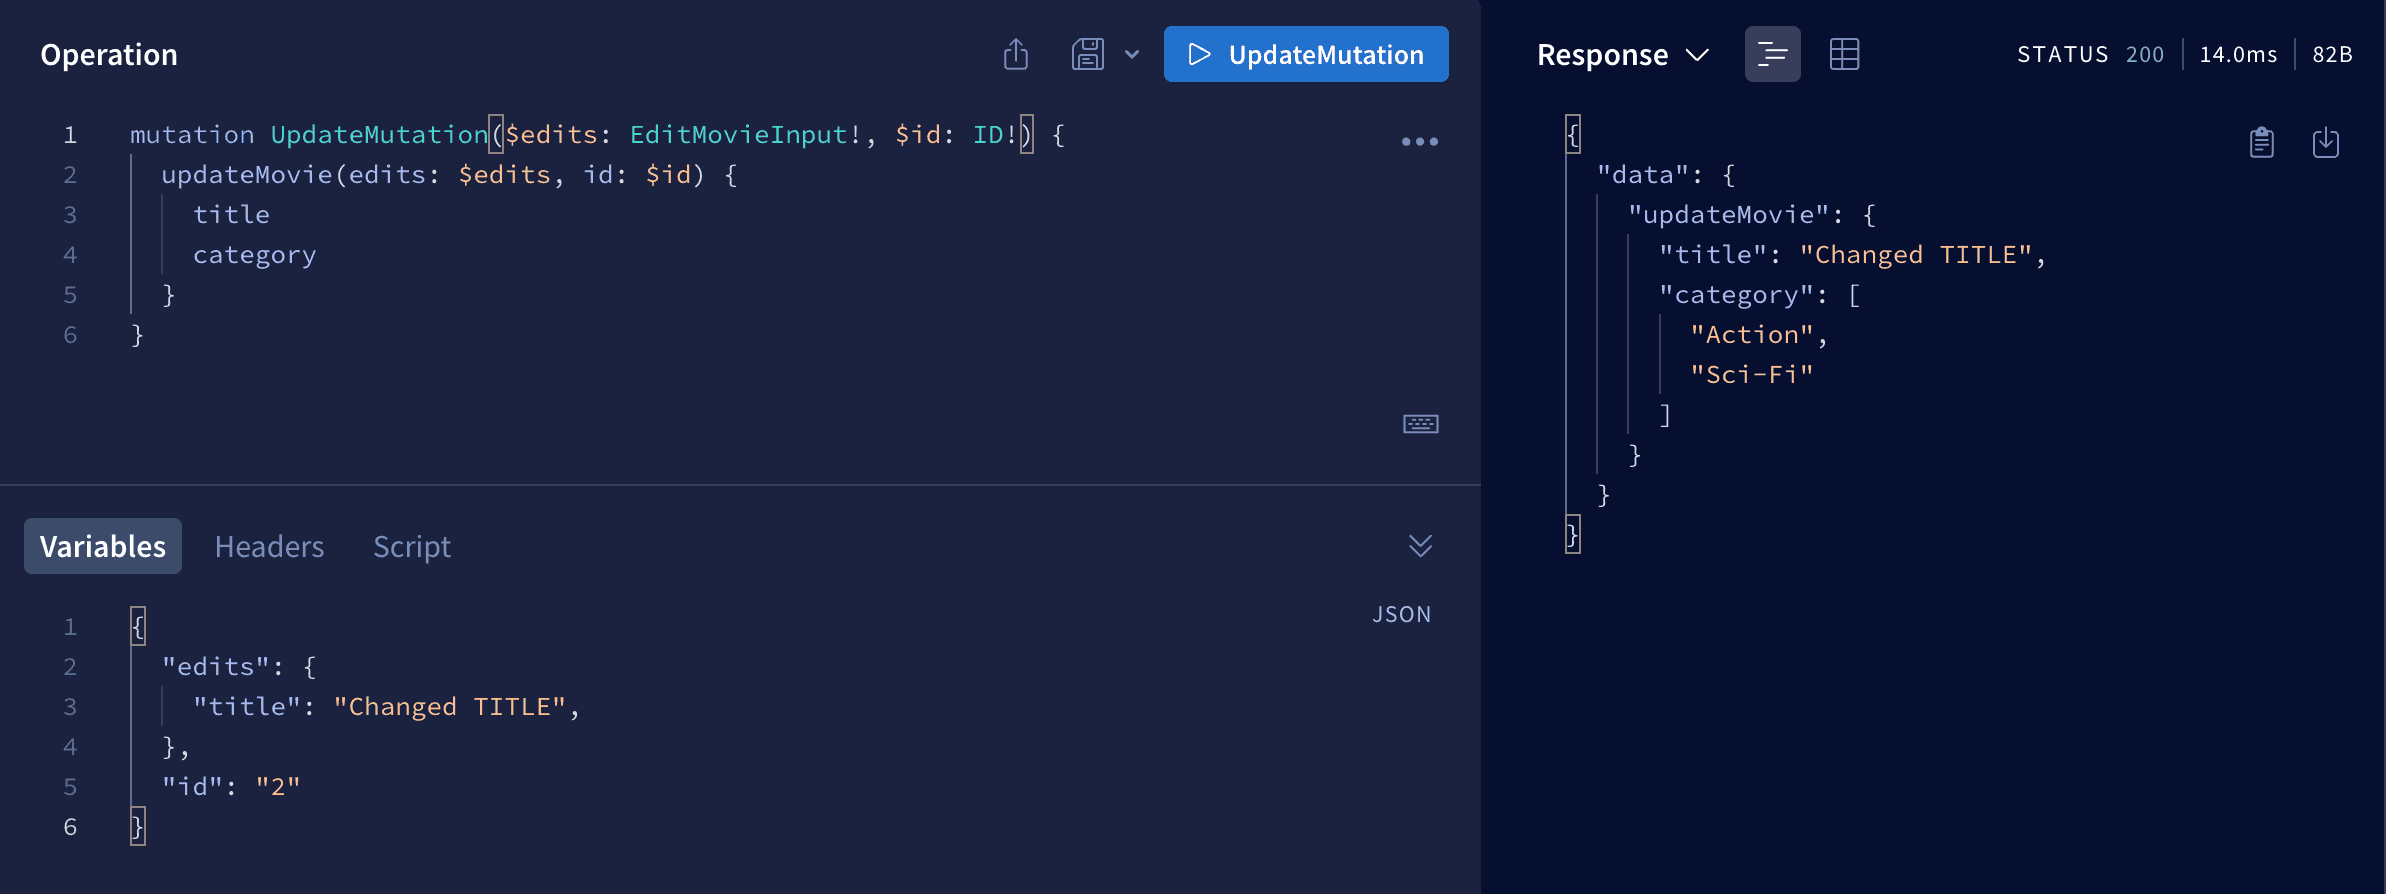
As you can see everything is working as expected. We updated the movie with id=2 and only the title was modified.
Source code
All the source code from this article you can find here.
Summary
In this article, I wanted to discuss the basics of working with graphQL and show that it can be an interesting alternative to REST API. I really hope you enjoyed and you hopefully feel comfortable now with the basics of this technology. Thanks!
Photo by Alina Grubnyak on Unsplash